.png?width=48&name=image%20(10).png)
E2E (end-to-end) testing focuses on what matters most at the end of the day: making sure that users will be able to achieve their goals within the application. This post is a step-by-step tutorial to show you how to leverage Cypress and jump right into the action. It’ll help you get comfortable with setting up the testing environment and writing some basic tests in your application.
What is E2E testing?
E2E testing is a way to test your app just like the end-user is going to use it. With E2E tests, we can ensure that the flow of the application and user interface (UI) behave as expected. By simulating real-life scenarios, we can cover the critical paths. This has two main benefits:
- We get quick feedback about whether we broke something when developing a new feature or fixing a bug.
- We save some time for the testers to test the same basic path again.
Why use Cypress E2E to test your application?
To write the E2E tests, we need a testing framework. There are a few options that are widely known and used, but Cypress is the most popular. The main reasons for that are great API and nicely written documentation.
- It has a sweet test runner that will start your app in the browser with all the steps listed and ready.
- It makes debugging nice and easy. You can see the state of the app at any time and preview how the UI looks before and after each step of the test.
- It automatically waits for commands, assertions, and API calls.
- It uses Chai and Mocha. They are both very popular tools. Chai is an assertion library. Mocha is a framework that provides the syntax for testing in
a behavior-driven development style. - It can be easily extended with custom commands or a plugin.
OK, now we have a glimpse of why E2E tests are beneficial and why you should use Cypress. Let’s leave theory for a second and see it in action.

To set up Cypress in a Vue + Vite project, we have to add a Cypress dependency and run it to scaffold test suite structure:
yarn add -D cypress
yarn cypress open
With just a few tweaks, we’re ready to write our first E2E tests. First, let's add a command to package.json under scripts to easily start Cypress:
"scripts": {
   "test": "yarn cypress open"
}
Now, let’s update the Cypress config file under the cypress.json as follows:
{
   "baseUrl": "http://localhost:3000"
}
That’s all the setup we need to test a Vue + Vite application.
Cypress E2E testing in practice
I have prepared a basic to-do app. It’s created with Vite, and I’ve set it up exactly as described above. You can see the test already written in the app. Here’s how I created them so you can adjust the process to your own app.
In the to-do app, let’s run the yarn test, so we open Cypress with the list of all our test files. It should be clear by the name of the file what feature we want to test. For example, in an eCommerce app, we could create files named something like add-to-cart or add-to-wishlist.
.png?width=512&name=unnamed%20(11).png) List of all the test files in our app.
List of all the test files in our app.
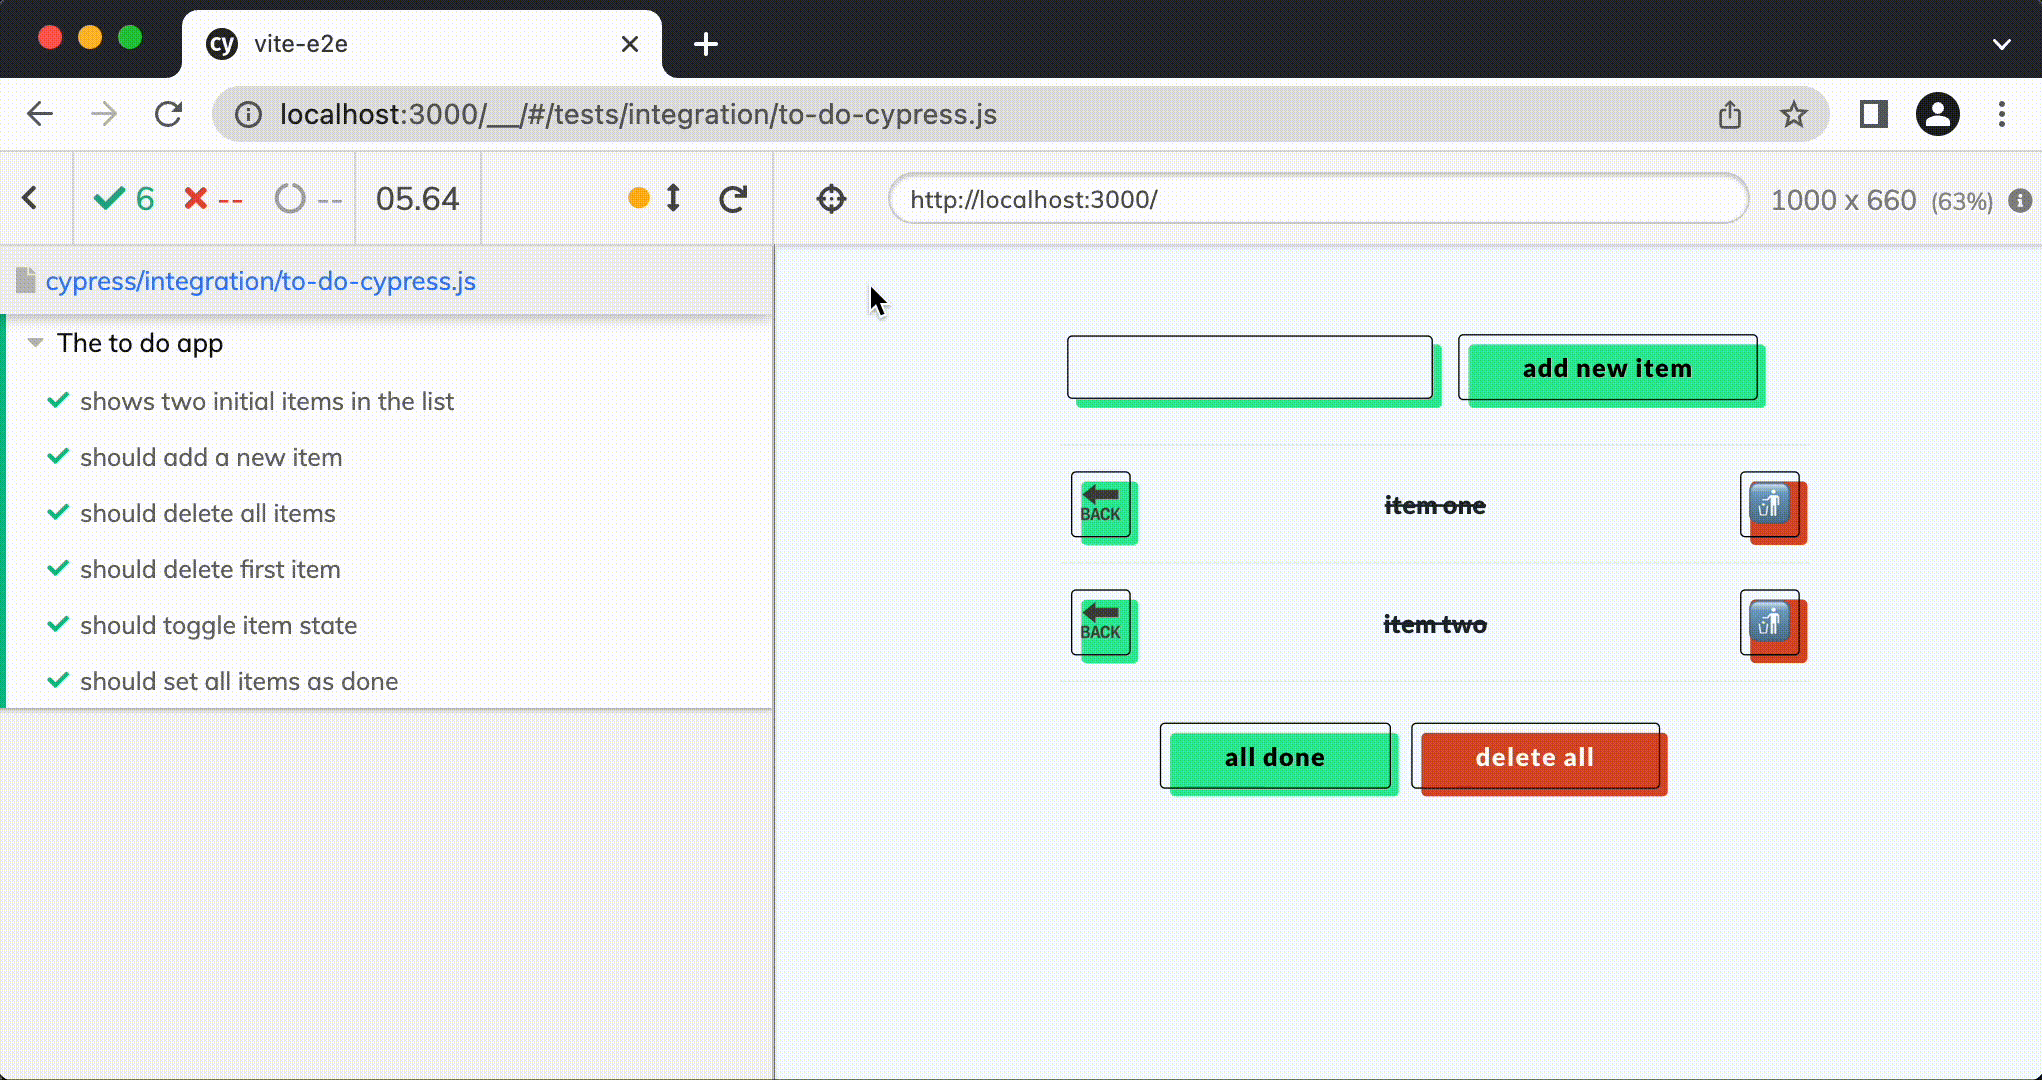
When we choose the test to run, the test runner will open the browser and start testing. Let’s begin with to-do-cypress.js.
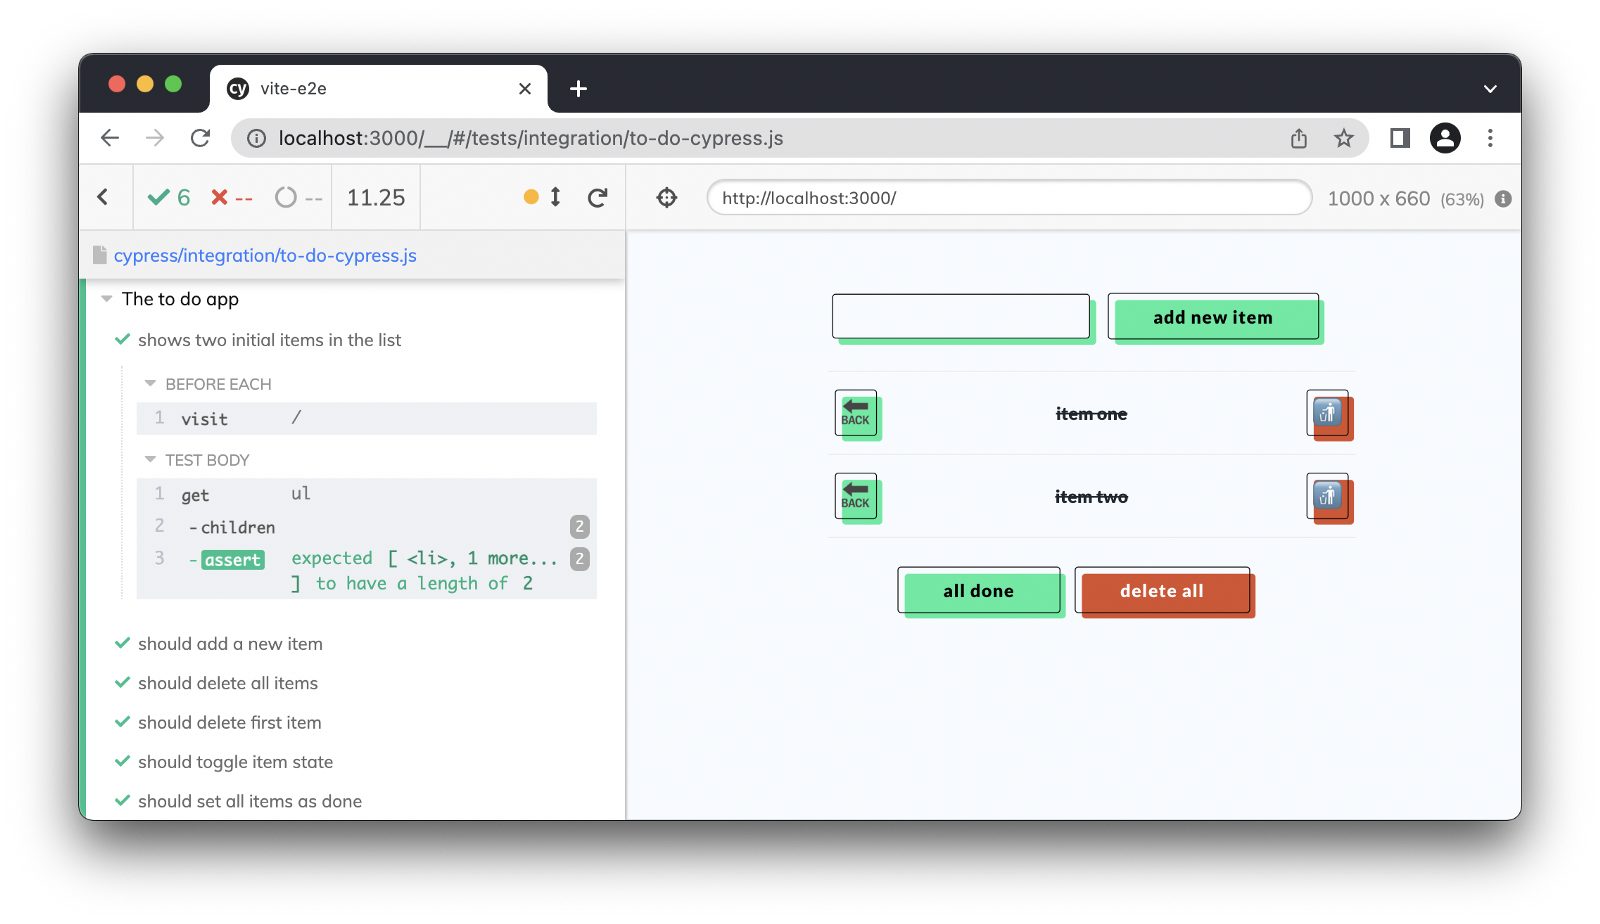 Test runner view.
On the left, we can see all of the tests we wrote for a specific part of the app. Each test has all its steps listed. We can verify if it works as expected and, in case of errors, easily find a bug and fix it. On the right, you can see the app loaded in the Chromium browser.
First test
To start with any test, we need to describe the test suite. We do that by using the Cypress API to describe the method. This includes the actual test inside it method. Let’s check if the app initializes properly.
describe("The to-do app", () => {
   it("shows two initial items in the list", () => {
   // here is the body of the test itself
   })
})
Now, it’s clear that we test the to-do app by verifying its starting UI.
Let’s open the base URL in Cypress. To do that, we need to tell Cypress to visit a specific page. We can do that by running visit command inside it method:
describe("Homepage", () => {
   it("shows two initial items in the list", () => {
      cy.visit("/")
   })
})
cy is the starting point of the Cypress API. visit is one of the basic methods where we specify the URL to open.
Now, we should check if there are two items on the list. In other words, we want to grab the list and check how many children it has. Another great feature of Cypress comes in handy here: the selector playground. Just simply click the select icon next to the test runner URL bar, and then click on any element on the page to get the Cypress selector ready.
Selection of the elements through the Selector Playground.
Having the correct item selected, we can ask for its children in the DOM elements and see that there are two in total.
describe("Homepage", () => {
   it("shows two initial items in the list", () => {
      cy.visit("/")
      cy.get("ul").children().should("have.length", 2)
   })
})
Most of the Cypress methods are chainable, and thanks to that, we can test with minimal effort. The actual test took us just a single line of code!
Second test
Let’s check if a new item can be added to the list. First, we should refresh the page by using the cy.visit("/") command just to be sure the tests won’t interfere with one another. Then, let’s say the user types “new item” into the input and presses enter. We can see that there are three items on the list, and the first one contains the typed text.
describe("Homepage", () => {
   it("shows two initial items in the list", () => {
      cy.visit("/")
      cy.get("ul").children().should("have.length", 2)
   })

it("should add a new item", () => {
   cy.visit("/")
   cy.get("input").type("new item{enter}")
   cy.get("ul").children().should("have.length", 3)
   cy.get("ul")
      .children()
      .first()
      .should("contain.text", "new item")
   })
})
Improvements
Since we always want to start a test with a fresh page, we can use the beforeEach hook. This will save us some writing, and it gathers the same code
in one place. It fires before each test.
describe("Homepage", () => {
   beforeEach(() => {
      cy.visit("/")
   })

it("shows two initial items in the list", () => {
   cy.get("ul").children().should("have.length", 2)
   })

it("should add a new item", () => {
   cy.get("input").type("new item{enter}")
   cy.get("ul").children().should("have.length", 3)
   cy.get("ul")
      .children()
      .first()
      .should("contain.text", "new item")
   })
})
We select the list of items by <ul> tag, which is fine for now, but what would happen if some other list was introduced to the page? The answer is errors and failed tests. Let’s add a list of app authors and run the tests again:
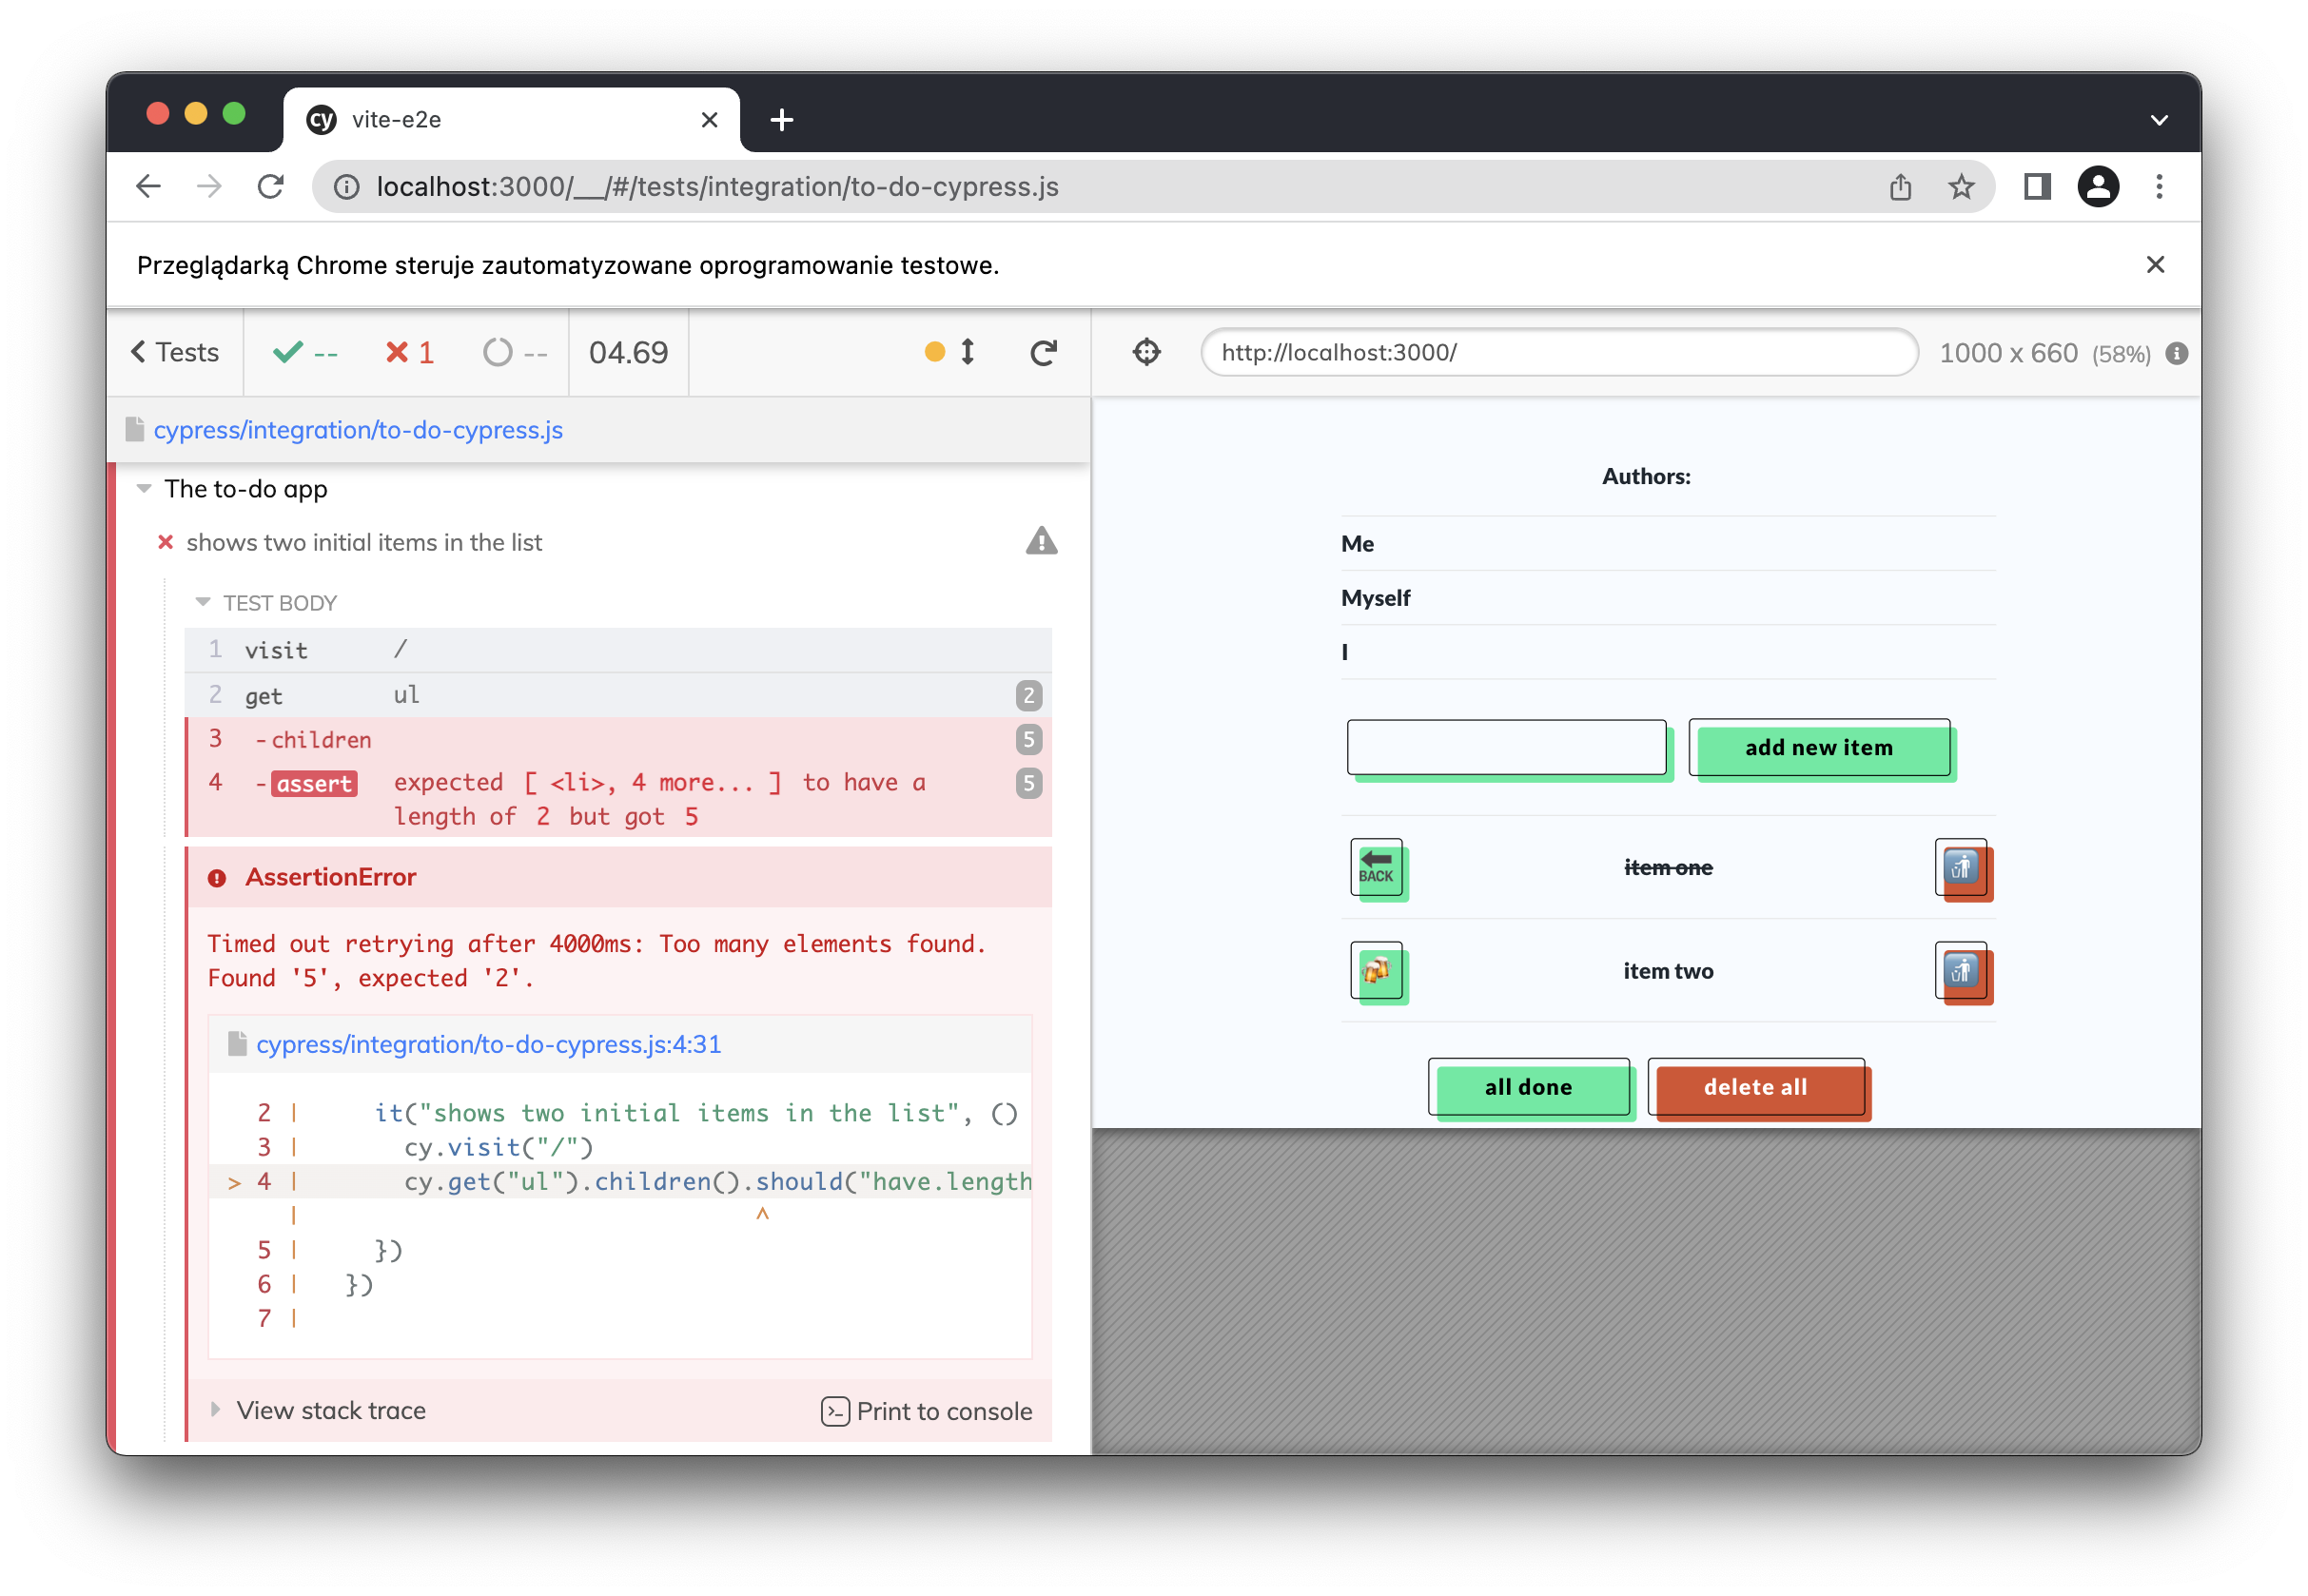
Debugging with Cypress.
The errors show exactly where the problem is. Cypress took all of the <ul> elements on the page and collected its children. The actual length was five because there are three items in the authors list and two on the to-do list. That’s why we need to be more specific when selecting elements on the page. One of the most reliable methods is to use some test-specific attributes like, for example, data-test-id. Let’s add that to our HTML.
<ul data-test-id="to-do-list">
Then, in the test, we can select elements by this attribute:
describe("Homepage", () => {
   beforeEach(() => {
      cy.visit("/")
   })

it("shows two initial items in the list", () => {
   cy.get("[data-test-id=to-do-list]")
      .children()
      .should("have.length", 2)
   })
})
Now, all of the tests pass, and the tests are less sensitive to changes in the app.
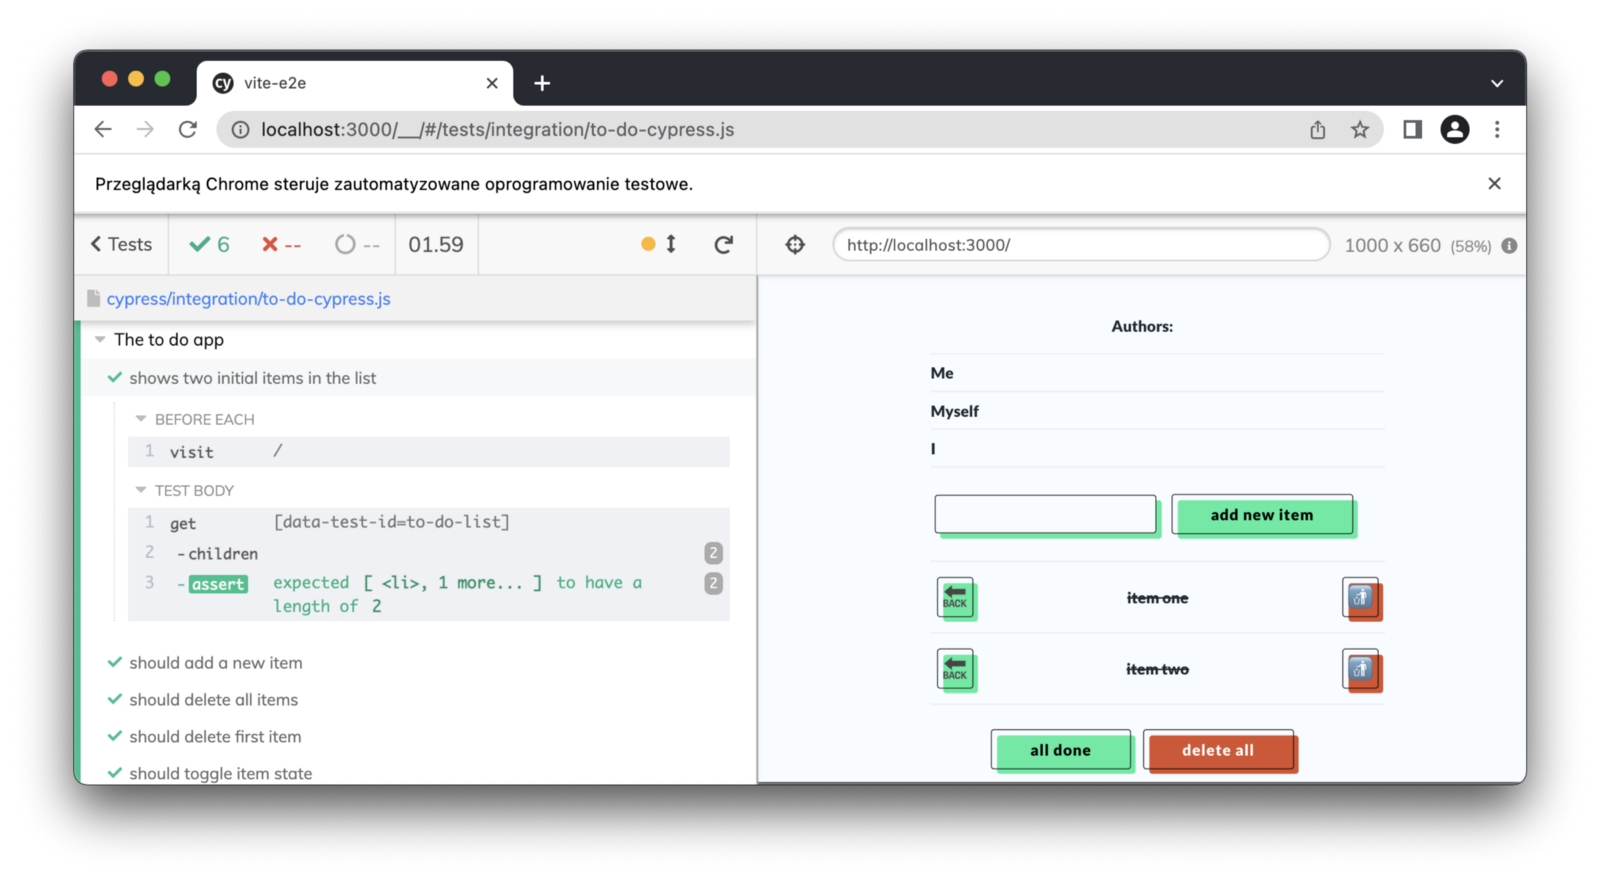
Passing tests with the “data-test-id” attribute.
Custom commands
The last improvement I wanted to share with you here are the custom commands. As we decided to use data-test-id attribute to select the elements on the page, we have to write it the long way:
cy.get("[data-test-id=to-do-list]")
Let’s shorten it down by adding tests/e2e/support/commands.js file with the code below:
Cypress.Commands.add("the", (testSelector) =>
   cy.get(`[data-test-id=${testSelector}]`)
)
Now, we can simplify the code by using our custom command where we pass the attribute value as a parameter. It’s available just like a native command:
describe("Homepage", () => {
   beforeEach(() => {
      cy.visit("/")
   })

it("shows two initial items in the list", () => {
   cy.the("to-do-list")
      .children()
      .should("have.length", 2)
   })
})
In my opinion, E2E tests don’t have to be written by a developer. It can be done by the tester as well. E2E testing benefits everyone involved in the project along with the users.
I hope this article has been helpful for you to understand the reasons behind Cypress E2E testing and how to get started with it. I strongly encourage you to try it yourself, so don't hesitate to use my repository as a playground and add some more green tests!
If you have a question, feel free to drop a comment or message me on LinkedIn.
Published February 2, 2022
.png?width=64&name=image%20(10).png)